Juul Hobert

IT Consultant @ Info Support

Imagine you are building a full-text search solution for a client. Almost everything is there, except for one small but annoying gap: you need a simple way to manage synonyms. Adding this to an existing SaaS product is cumbersome, and you are understandably hesitant to introduce custom code that tightly couples you to that SaaS platform.

I run into this type of scenario more often than you would expect. Building a full-blown admin panel feels like overkill, especially when it requires setting up a backend, authentication, CRUD endpoints, and all the usual plumbing.

In this post I will show how you can use Data API Builder to spin up a REST API with minimal effort. No application code, just configuration. This will already provide you a backend solution, after which only the frontend needs to be created next.

Installing Data API Builder

The first step is installing the Data API Builder tool. I am going to assume you already have dotnet installed on your machine.

dotnet tool install --global Microsoft.DataApiBuilder

Choosing a database

For the database I deliberately choose an open source solution. That gives freedom. No vendor that can suddenly decide to increase licensing costs next year. PostgreSQL is a solid choice here.

To keep things simple, I start by adding a docker-compose file so I can run Postgres locally. Make sure your firewall is enabled. I should not have to explain why these default credentials are unsafe outside of a local setup.

# docker-compose.yml
services:
  postgres:
    image: postgres:latest
    environment:
      POSTGRES_DB: myapp
      POSTGRES_USER: appuser
      POSTGRES_PASSWORD: apppassword
    ports:
      - "5432:5432"
    volumes:
      - postgres_data:/var/lib/postgresql
#      - ./docker-entrypoint-initdb.d:/docker-entrypoint-initdb.d

volumes:
  postgres_data:

Database first, again

Choosing Data API Builder gives me some old-school vibes. We are back to a database-first approach. These days, when writing application code, we almost always start code-first. Here it is the other way around.

For this blog I keep the table deliberately simple. I skip aspects like indexing to keep the focus on the API itself. In a real-world scenario, especially when the table starts to grow, you should absolutely think about indexes.

The following SQL statement defines a table to store synonyms.

-- 001-create-synonym-table.sql
CREATE TABLE IF NOT EXISTS synonym (
    id            BIGINT GENERATED ALWAYS AS IDENTITY PRIMARY KEY,

    synonym_group TEXT NOT NULL,
    rule          TEXT NOT NULL,

    locale        TEXT NOT NULL,
    is_active     BOOLEAN NOT NULL DEFAULT true,

    description   TEXT,

    CONSTRAINT uq_search_synonym UNIQUE (synonym_group, rule)
);

Initializing Data API Builder

Now it is time to initialize Data API Builder using the dab tool. Run the following command:

dab init --database-type "postgresql" --host-mode "Development" --connection-string "Host=localhost;Port=5432;Database=myapp;User ID=appuser;Password=apppassword;"

This creates a new file called dab-config.json. With that in place, we can start adding entities. The next command adds our synonym table as an entity and exposes it as a REST endpoint.

dab add Synonym --source public.synonym --permissions "authenticated:create,read,update,delete" --rest "synonyms" --graphql false

Authentication setup

Next up is authentication. My original plan was to use Keycloak and configure the provider as a Custom provider. Unfortunately, at the time of writing there are still issues with this approach (see #2820).

For now, I switch the provider to Simulator. This allows me to pass a header that defines the security role. Not production-ready, but good enough to demonstrate the flow.

//...
      "authentication": {
        "provider": "Simulator"
      },
//...

Starting the API

That is all that is needed to get things running. With the following command, the API starts up and becomes available on localhost:5000.

 $env:DAB_ENVIRONMENT="Development"; dab start

Open a browser and navigate to http://localhost:5000/swagger. Expand the POST endpoint and set the X-MS-API-ROLE header to authenticated. Then send the following request body:

{
  "synonym_group": "large",
  "rule": "large,huge,massive,enormous,gigantic,immense,colossal,substantial",
  "locale": "en",
  "is_active": true,
  "description": "Great physical size"
}

Post synonym

At this point the API accepts the request and stores the synonym. A quick check in the database confirms that the record is indeed there.

Table

Conclusion

In this post I walked through using Data API Builder to create a REST API with nothing more than configuration. For scenarios like admin panels, this can be surprisingly effective. You get CRUD endpoints out of the box, including filtering capabilities that feel very similar to OData.

That said, the tool does not feel fully finished yet to me. The Custom authentication provider is currently having issues, and PostgreSQL support is more limited compared to Azure SQL. If you decide to use Data API Builder, it is probably wiser to stay within the Microsoft ecosystem, think about using Entra and Azure SQL.

Still, I see real value here. It is an easy way to setup an API quickly, without committing to a full backend implementation. Given its association with Fabric, I expect this tool to mature further and become more interesting over time.

In many application landscapes, you see a combination of synchronous and asynchronous communication. Synchronous communication means: system A calls system B and waits for a response before proceeding. That’s simple, but quickly leads to scalability limitations.

That’s why more and more organizations are switching to asynchronous communication. In this case, a system sends a message to a queue and continues without waiting for an immediate response. The receiving system reads the messages at its own pace. A popular solution for this is Azure Service Bus. A robust messaging solution that offers queues and topics for decoupling systems.

And then it goes wrong...

In practice, the Service Bus is often set up as an internal integration layer within a single application or domain. Think of communication between microservices. That works fine as long as only internal components are reading or writing messages.

The problem arises as soon as external systems start using this same Service Bus. This happens more often than you might think. Other teams, other applications – sometimes even external vendors – connect directly to the bus. You then see something like this:

Diagram

The Service Bus, originally intended as an internal mechanism, now becomes a shared integration layer. Consequence: it becomes unmodifiable. If you change something in the setup of your system, it impacts external systems. And if an external party is involved, you’ll face processes beyond your control: coordination, waiting times... In short: more bureaucracy.

The solution: centralize access

The solution is simple: place an Azure Application Gateway in front of your Service Bus. Don’t let external systems connect directly to your Service Bus, but go through this gateway. This way, you maintain control over the endpoint while being free to change or refactor things behind the scenes.

Benefits: – You can introduce an alternative (drop-in replacement) messaging solution without external parties noticing. – You prevent internal components from needing to be publicly accessible.

What you need

Azure Service Bus supports AMQP over WebSockets. That’s important because Azure Application Gateway does not support native AMQP traffic, but it does support HTTPS and WebSockets.

Additionally, your Service Bus must be in a VNet. Note: only the Premium SKU supports this. So make sure you’re using this version.

Configuring Application Gateway

Create a new Application Gateway
Use at least the Standard_v2 SKU, as it supports communication via your VNet. Choose or create a public IP address.

Create app gateway

Configure a backend pool and routing rule
Use your own (sub)domain, such as servicebus.akkerweg6.nl. Choose HTTPS. Certificate management via Key Vault is out of scope for this blog, but assume this is already arranged.

Routing rule

Add a health probe
Azure Service Bus doesn’t have a standard health endpoint, but /$namespaceinfo works fine. If you get a 401 or 403 response, you know the Service Bus is alive (the gateway can’t authenticate, so this status is expected).

Health probe

Testing with a Kotlin application

With the Kotlin code below, I demonstrate how to read messages from a queue via the Application Gateway. The Service Bus is private; only traffic through the gateway is allowed.

import com.azure.core.amqp.AmqpTransportType
import com.azure.messaging.servicebus.ServiceBusClientBuilder
import com.azure.messaging.servicebus.models.ServiceBusReceiveMode

fun main() {
    println("Starting Azure Service Bus client with custom gateway configuration")

    val connectionString = "Endpoint=sb://<REPLACE WITH YOUR OWN CONNECTION STRING>"
    val queueName = "blog"

    val receiverClient = ServiceBusClientBuilder()
        .connectionString(connectionString)
        .customEndpointAddress("https://servicebus.akkerweg6.nl")
        .transportType(AmqpTransportType.AMQP_WEB_SOCKETS)
        .receiver()
        .receiveMode(ServiceBusReceiveMode.PEEK_LOCK)
        .queueName(queueName)
        .buildClient()

    receiverClient.use {
        println("Connected to Service Bus queue: $queueName")
        receiverClient.peekMessages(10).forEachIndexed { i, message ->
            println("Message #$i:")
            println("  Message ID: ${message.messageId}")
            println("  Sequence #: ${message.sequenceNumber}")
            println("  Content: ${message.body}")
            println("  Properties: ${message.applicationProperties}")
            println("  Enqueued Time: ${message.enqueuedTime}")
            println()
        }
    }
}

Note: – customEndpointAddress points to your Application Gateway. – AMQP_WEB_SOCKETS is essential. Without this setting, HTTPS traffic won’t work. – In production, it’s recommended to use Managed Identity + RBAC instead of connection strings.

Example output

Starting Azure Service Bus client with custom gateway configuration
Connected to Service Bus queue: blog
Message #0:
  Message ID: 34d9c105556c4e829400c0d10fb6eb56
  Sequence #: 2
  Content: Welcome!
  Properties: {}
  Enqueued Time: 2025-06-28T10:12:45.778Z

Message #1:
  Message ID: 50d8340b93c54f078473059f6332a0ee
  Sequence #: 3
  Content: You've received this message through the app gateway, awesome!
  Properties: {}
  Enqueued Time: 2025-06-28T10:13:05.778Z

Summary

By placing an Application Gateway in front of your Service Bus, you create a secure, flexible, and manageable integration layer. External systems communicate via a stable endpoint while you retain the freedom to innovate or refactor internally. This way, you avoid tight coupling and maintain control over your architecture.

There they are, three little Intel NUCs. They’ve lived their lives as desktop computers. Unfortunately, they’re no longer suitable for running Windows 11. That’s why they ended up with me. It wasn’t hard for me to come up with a new purpose for them: a Kubernetes cluster.

Nucs

I’m looking at the three computers now, but why do I actually need three? For a distributed system, wouldn’t two computers be enough?

Correct, for a distributed system or even a “cluster,” two nodes are sufficient. In fact, you can run a Kubernetes “cluster” on just 1 node. The confusion comes from the fact that you probably want to reach a quorum to run etcd.

Etcd is a distributed, strongly consistent key-value store that serves as the authoritative, fault-tolerant source of cluster state for Kubernetes.

Let’s break that down...

Distributed means the data is replicated across multiple nodes

Strongly consistent means everyone sees the most recent successful write

Fault-tolerant source means it continues to operate even if a node crashes

That last characteristic requires you to have a quorum—in other words, a minimum number of voters needed to reach a decision.

And that’s the answer to my question of why I need three computers. With three nodes, I have a quorum of two and fault tolerance of one. One node can fail, and the remaining two still form a majority and can make decisions. This is the minimum needed to perform an update to the host operating system while the other two nodes keep running and can still make decisions.

I hope you enjoyed my first blog about distributed computing. In the coming period, I’ll be experimenting with these little NUCs and we’ll discover the various ways distributed computing can fail. Also I haven't answered what happens in practice when the quorum can't be reached.

Oh and I must admit, though—I’ve cheated a little. While writing this blog, I actually only own two Intel NUCs. But luckily, with the power of AI, I was able to generate an image with three stacked on top of each other. Wish me luck in finding a third one!

When managing one or more Azure functions, I prefer to have centralized configuration management, especially in the context of a distributed system. This provides me a clear place where all configuration comes together. Azure App Configuration enables us to do this. However, when you change a configuration, it's convenient if applications apply the new values immediately without the need to restart the app. Setting up an Azure Function to achieve this is unfortunately not straightforward yet. In this post, I will show how I have solved this in a demo application.

Some details have been omitted for readability. If you feel something is missing, please check the Github repository where the final result can be found. Did this blog help you? Then don't forget to leave a star at the Github project.

Example application

I will start with a simple “hello world” application. There is one function present that works with an HttpTrigger. The output of the function is a piece of text. Initially, the output will be “Hello world”. I will replace 'world' with a name configured in Azure App Configuration later on.

using Microsoft.Azure.WebJobs.Extensions.Http;

namespace JuulHobert.Blog.FunctionAppWithAppConfig;

public class HelloWorld
{
    [FunctionName("HelloWorld")]
    public IActionResult Run(
        [HttpTrigger(AuthorizationLevel.Anonymous, "get", Route = "hello-world")]
        HttpRequest req) => new ContentResult
    {
        Content = "Hello World!",
        ContentType = "text/plain"
    };
}

I can run this Azure Function locally, and when I do and open http://localhost:7071/hello-world in a browser, I see the text.

The fixed text Hello world is returned. The next step is to use a value from the app configuration and return it in the response.

App configuration

The next step is to add some libraries.

It is necessary to configure dependency injection to be able to receive the configuration in the constructor of the HelloWorld class. I do this by adding a Startup class. In addition, I also add support for feature flags. I will use this to put the new functionalities behind a feature flag. This allows me to apply trunk based development. This is a topic that deserves a separate blog. For now, it is sufficient to know that this allows us to turn functionalities on and off.

using System;
using Azure.Identity;
using JuulHobert.Blog.FunctionAppWithAppConfig;
using Microsoft.Azure.Functions.Extensions.DependencyInjection;
using Microsoft.Extensions.Configuration;
using Microsoft.Extensions.DependencyInjection;
using Microsoft.FeatureManagement;

[assembly: FunctionsStartup(typeof(Startup))]

namespace JuulHobert.Blog.FunctionAppWithAppConfig;

public class Startup : FunctionsStartup
{
    private const string AppConfigEndpointEnvironmentVariableName = "AppConfigEndpoint";

    public override void ConfigureAppConfiguration(IFunctionsConfigurationBuilder builder)
    {
        var credentials = new DefaultAzureCredential();
        var appConfigEndpoint = Environment.GetEnvironmentVariable(AppConfigEndpointEnvironmentVariableName);
        if (string.IsNullOrEmpty(appConfigEndpoint))
        {
            throw new InvalidOperationException("AppConfigEndpoint is not set");
        }

        builder.ConfigurationBuilder.AddAzureAppConfiguration(options =>
            options
                .Connect(new Uri(appConfigEndpoint), credentials)
                .Select($"{ServiceOptions.SectionName}:*")
                .ConfigureKeyVault(kv => kv.SetCredential(credentials))
                .UseFeatureFlags()
                .ConfigureRefresh(x => x.Register("JuulHobertBlog:Name", refreshAll: true)));
    }

    public override void Configure(IFunctionsHostBuilder builder)
    {
        builder.Services
            .AddAzureAppConfiguration()
            .AddFeatureManagement()
            .Services
            .AddOptions<ServiceOptions>()
            .Configure<IConfiguration>((settings, configuration) =>
            {
                configuration.GetSection(ServiceOptions.SectionName).Bind(settings);
            });
    }
}

public class ServiceOptions
{
    public const string SectionName = "JuulHobertBlog";

    public string Name { get; set; } = string.Empty;
}

I read the environment variable AppConfigEndpoint in the Startup class and use managed identity for authorization. In my code, I use DefaultAzureCredential, which tries different underlying credentials to gain access. I ensure that on my local machine, I am logged in with the command az login. The Azure Function deployed in Azure will use managed identity. Managed identity ensures that I no longer have to worry about securely storing credentials, as Azure now takes care of this for me.

Hello <configured name>

It's time to modify the HelloWorld class. I'm going to return the configured name with the help of app configuration. I will put this new functionality behind a feature flag so that the change can be turned on and off.

using System.Threading.Tasks;
using Microsoft.AspNetCore.Http;
using Microsoft.AspNetCore.Mvc;
using Microsoft.Azure.WebJobs;
using Microsoft.Azure.WebJobs.Extensions.Http;
using Microsoft.Extensions.Options;
using Microsoft.FeatureManagement;

namespace JuulHobert.Blog.FunctionAppWithAppConfig;

public class HelloWorld
{
    private const string FeatureConfigName = "ConfigName";

    private readonly IOptions<ServiceOptions> _options;
    private readonly IFeatureManager _featureManager;

    public HelloWorld(
        IOptionsSnapshot<ServiceOptions> options,
        IFeatureManager featureManager)
    {
        _options = options;
        _featureManager = featureManager;
    }

    [FunctionName("HelloWorld")]
    public async Task<IActionResult> Run(
        [HttpTrigger(AuthorizationLevel.Anonymous, "get", Route = "hello-world")]
        HttpRequest req)
    {
        var featureEnabled = await _featureManager.IsEnabledAsync(FeatureConfigName);
        var content = featureEnabled ? $"Hello {_options.Value.Name}" : "Hello World!";

        return new ContentResult
        {
            Content = content, ContentType = "text/plain"
        };
    }
}

If I try to start the Azure Function locally now, it doesn't work anymore. I get the error shown below.

Error building configuration in an external startup class. JuulHobert.Blog.FunctionAppWithAppConfig: AppConfigEndpoint is not set.

First, I need to create an app configuration and set the environment variable.

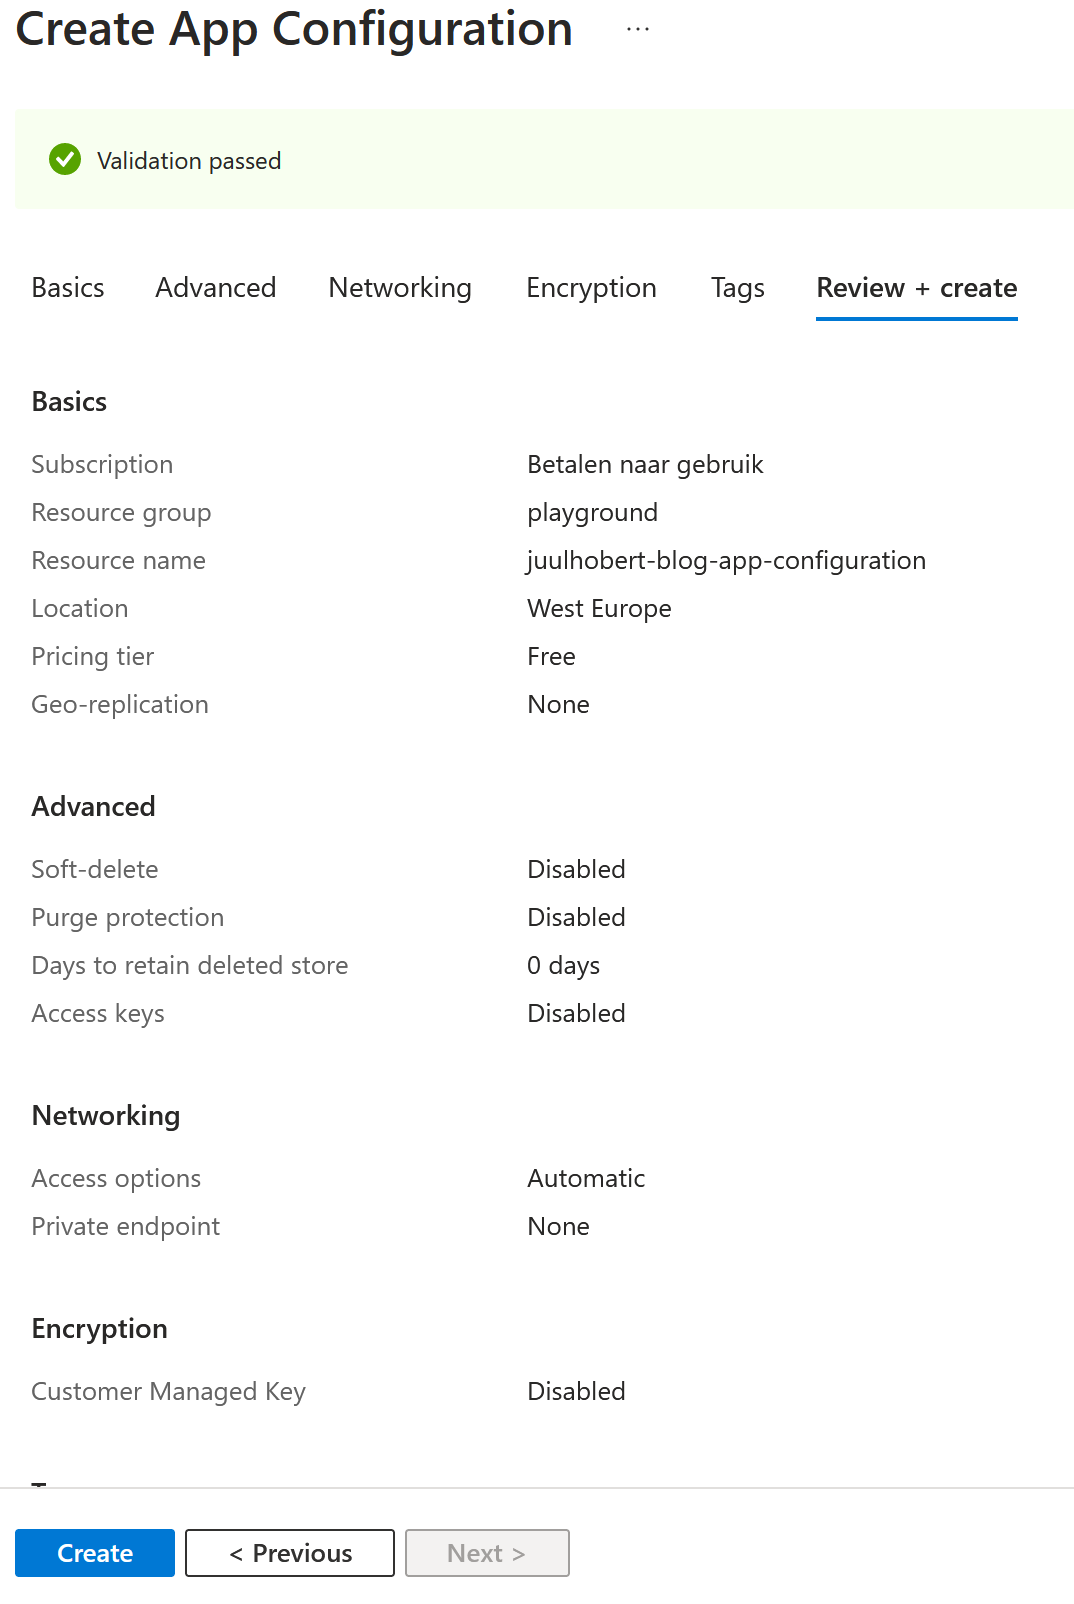
Create an App configuration manually

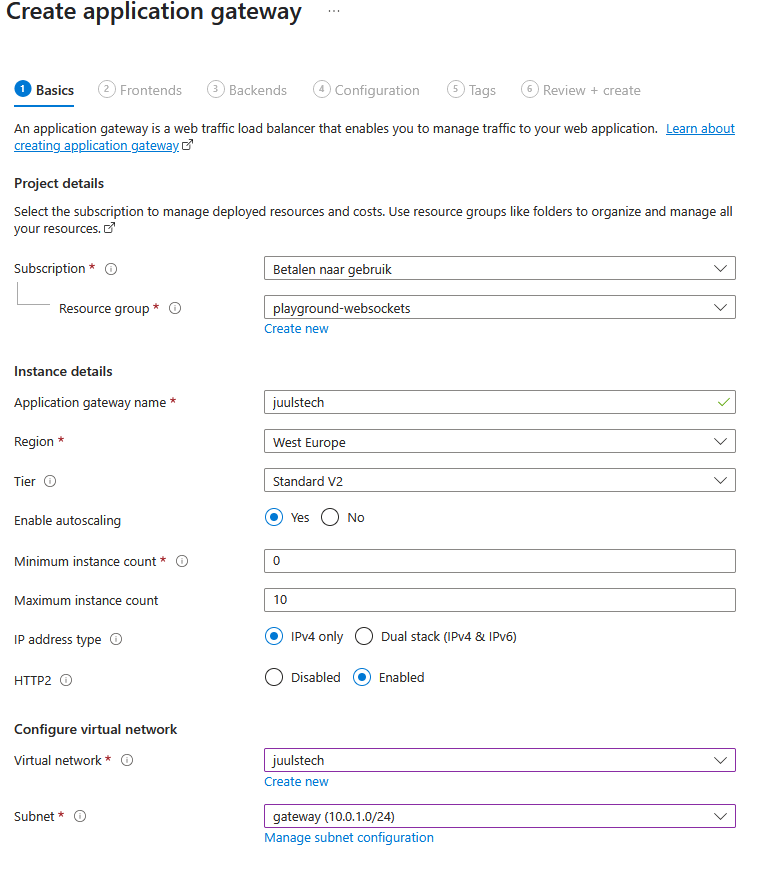
I create the app configuration in the Azure portal. I do this using the settings shown in the image. I choose the pricing tier “Free” and make the configuration accessible via the public internet. Do not use these settings for a production environment!

Create app configuration

I assign myself the right App Configuration Data Owner. This allows me to modify the configuration and run the Azure function locally while reading the configuration. I know from experience that it can take some time before the assignment is allocated.

I modify the file local.settings.json and include the endpoint in the configuration. Additionally, I ensure that I have already logged in at least once using the command az login.

{
  "IsEncrypted": false,
  "Values": {
    "AzureWebJobsStorage": "UseDevelopmentStorage=true",
    "FUNCTIONS_WORKER_RUNTIME": "dotnet",
    "AppConfigEndpoint": "https://juulhobert-blog-app-configuration.azconfig.io"
  }
}

It's time to start up the application. When I open http://localhost:7071/hello-world in the browser, the result is still unchanged. This is correct, because I haven't added the feature flag yet. I add the feature flag and also set the configuration. I restart the azure function and view the page again in the browser. Hooray! I now see Hello Juul.

TimerTrigger

The simplest way to refresh the configuration, in my opinion, is by using a TimerTrigger. This is a trigger where a time schedule can be configured. The function will then be invoked at regular intervals. The code below will refresh the configuration every minute.

using System.Threading.Tasks;
using Microsoft.Azure.WebJobs;
using Microsoft.Extensions.Configuration.AzureAppConfiguration;
using Microsoft.Extensions.Logging;

namespace JuulHobert.Blog.FunctionAppWithAppConfig;

public class RefreshAppConfiguration
{
    private readonly IConfigurationRefresherProvider _refresherProvider;

    public RefreshAppConfiguration(
        IConfigurationRefresherProvider refresherProvider)
    {
        _refresherProvider = refresherProvider;
    }

    [FunctionName("RefreshAppConfiguration")]
    public async Task RunAsync(
        [TimerTrigger("0 * * * * *")] TimerInfo timer,
        ILogger logger)
    {
        foreach (var refresher in _refresherProvider.Refreshers)
        {
            if (await refresher.TryRefreshAsync())
            {
                logger.LogInformation("Refreshed configuration");
            }
            else
            {
                logger.LogWarning("Failed to refresh configuration");
            }
        }
    }
}

This way of refreshing has its pros and cons. The major advantage is that it is the least complex solution. However, the disadvantages in my opinion are: – Refreshing takes some time; a configuration adjustment will only take effect once the TimerTrigger fires. – There is a limit to the amount of requests that can be made. If too many requests have been made, it is temporarily not possible to receive new values. Depending on the chosen SKU, it will take an hour or a day before this limit is reset.

Event Grid

Due to the mentioned drawbacks, I prefer working with an EventGridTrigger. This is a trigger that can be set to fire when the configuration is changed. The great advantage of this is that a change in the configuration takes effect immediately.

I will modify the code to be able to use Azure Event Grid. For this, I need to add the following library to my project.

After that, I will modify my existing class RefreshAppConfiguration and make use of the new trigger.

    [FunctionName("RefreshAppConfiguration")]
    public async Task RunAsync(
        [EventGridTrigger] EventGridEvent eventGridEvent,
        ILogger logger)
    {
        foreach (var refresher in _refresherProvider.Refreshers)
        {
            if (await refresher.TryRefreshAsync())
            {
                logger.LogInformation("Refreshed configuration");
            }
            else
            {
                logger.LogWarning("Failed to refresh configuration");
            }
        }
    }

To get this working, a number of things need to be created and configured in Azure. In short, an Azure function needs to be running, an app configuration created, managed identity needs to be set up, and the environment variable AppConfigEndpoint needs to be configured. Due to the amount of actions required for this, I found it more convenient to use a Bicep script. Bicep is a language from Microsoft that allows you to define Azure resource infrastructure in a simple and readable way.

First, delete the manually created app configuration in Azure. Then clone the repository containing the Bicep script:

git clone https://github.com/juulhobert/az-function-with-app-configuration.git

Next, I adjust the values in main.bicepparam to my preferences and deploy the whole thing in Azure:

.\deploy.ps1 <resource-group-name> [subscription-id]

Now open the following URL in your browser https://<function-app-name>.azurewebsites.net/hello-world. In Azure, you can modify the configuration and you will see that the value is immediately reflected in the response.

Summary

In this article, I have shown how Azure Functions can be used together with App Configuration to centrally manage the configuration of distributed systems.

I have demonstrated two different ways to refresh app configurations. I prefer to use the method that makes use of Event Grid, as it allows changes to be applied immediately.

If you found the content of this article helpful, please show your appreciation by leaving a star on my Github project